With EveryPig, you can track the health and well-being of all groups under your care. For the system to work correctly, you need to manage groups in EveryPig as described below.
On This Page
Groups on EveryPig Mobile
Creating Groups
Creating Blended/Commingled sources
Managing Groups
Caregiver Responsibilities
Managing Pig Placement Locations
Managing Destinations
How to create groups - Spanish
You must have an Admin Role to access the admin panel in EveryPig. If you need an Admin role, contact the person in your company responsible for setting up and managing EveryPig.
1. Managing Sources
To take full advantage of EveryPig group tracking, we recommend entering source information into your account before setting up your first group. Sources give you the ability to track the health of pigs at the source level, from start to closeout.
Typically customers track the sow unit performance using sources. It's also possible to track any source. For example, if you buy nursery pigs, you can enter the source nursery into the Sources table. It's up to you what you'd like the categorize as a "source."
Watch the video below for step-by-step how-to instructions for Managing Sources.
01:39 min
If your company doesn't have sources, you can leave this section blank. But remember, it's up to you what you'd like the categorize as a "source."
To track external farms as a Source, the Farm will need to have both the 'Sourcing Tracking' field as well as the 'External Farm' field selected in the Admin > Farm name > Farm Information.
2. Creating Groups
For EveryPig to work correctly for your system, we require you to manage groups as an Admin user. As an Admin you are required to create and maintain groups in EveryPig. Below is a description of how to create groups. Note: You can access Groups through EveryPigs mobile version.
- Open the Group tab on the left side menu
- You may also use the Import option here. This allows a user to upload more than one group at a time.
- You will need to complete the Group Import Template first before selecting Import.
- Groups can be hidden from this main page after they are closed. Click the down arrow to the right of 'Manage' then click 'Hide Group'. When a closed group is hidden, it will not appear on the Barn Sheets page.
- You may also use the Import option here. This allows a user to upload more than one group at a time.
- Click Create Group
- Creation Date (Dates before the current date can be picked from the calender icon)
- Users can set Group Ownership. When the user selects a Company for Ownership, the list of Farms displayed in the next section will only be managed farms of the company previously selected.
- Additional Fields include:
- Custom Group ID (can be changed at any time)
- Estimated delivery date range (only available if Scheduling feature is not enabled)
- Source (only available if Scheduling feature is not enabled). To ensure the source displays in the dropdown, make sure the Farm is labeled as 'External' as well as 'Sourcing Tracking'.
- Incoming Loads (only available when Scheduling is enabled)
- ABF Groups (Antibiotic Free Groups)
03:10 min
Pro Tip: Creating a group notifies users associated to the farm, so they know when to expect delivery. If you set a delivery timeframe, the user will also be notified on the day they should expect delivery.
Creating a group does not automatically start the group. To start a group - go to the Daily Checkup, find the farm where the group is scheduled to be delivered, and click "Start Group".
You can also create a Shipment from the Groups page to start the Group.
The addition of a custom group ID (use this if you need to reconcile this information with another system), and the ability to set estimated delivery date ranges—doing so will hide the group from the Daily Checkup until the date range selected.
- Groups can be accessed on your Mobile Device
-1.png?width=688&height=986&name=image0%20(5)-1.png)
3. Creating Blended/Commingled Sources when creating Groups
As part of the group setup process, you can create blended/commingled sources and link them to a group. For more information about sources, please review the managing sources tutorial.
You can blend or commingle as many external or internal sources as necessary. Creating a blend of sources while creating a group is easy, just click the "+ add source" link and add all the sources you wish. When you're done blending sources, EveryPig will automatically compare your blend to existing commingled sources in the database. If there's a match, we will alert you. This convenient feature will prevent you from creating duplicate sources and provide you with better data.
Watch the video below for step-by-step how-to instructions for creating blended/commingled groups as part of the group creation process.
01:12 min
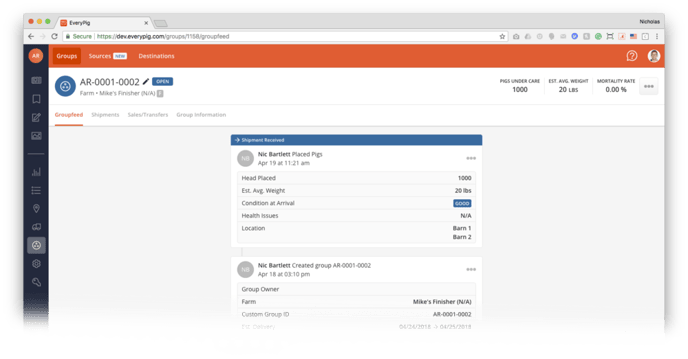
4. Managing Groups
As an Admin you are required to maintain groups in EveryPig. Each group has its profile; here you will find five tabs that give historical information about the group and allow you to manage the group during its lifetime. Below is a description of the group profile.
- The "Groupfeed" is a historical news feed of all the events surrounding a group
- Under the Shipments tab, you will find a table with all the confirmed shipments from the field. You can create new shipments here.
- The Transfers/Sales tab allows you to review and manage transfers and sales. You can create new Transfers/Sales here.
- The Group Information tab enables you to manage necessary information about a group.
- Admins can start the group on a specific day for Days on Feed or change the Days on Feed value for each group if needed.

- Group Flow allows you to track group from beginning to end.
If you use EveryPig Scheduling, you will see a Linked Loads tab and a Scheduled Loads tab. You can match loads to groups as well as ship and receive loads.
Pro Tip: Remember to check the "Action Required" tab in the group admin section regularly to ensure all groups stay up-to-date
5. Caregiver Responsibilities
When a group is scheduled, the caregiver assigned to the farm will receive a notification via email. When pigs from this new group arrive at the farm, caregivers will start the group by adding shipment information on the Daily Checkup. Shipment information is stored in the group profile (Groups Page).
01:13 min
As an admin, you can manage all group information entered by caregivers in the field.
6. Managing Pig Placement Locations
Multiple groups can exist on a single farm, and a farm can have multiple barns.
Managing pig placement location on new farms.
When you create a new farm in EveryPig, you have the option to add multiple barns. Once you have created the Farm, you will see a tab labeled 'Barns'. To add barns, click 'Create barn'.
.png?width=688&height=323&name=Screenshot%20(579).png)
Be sure to name barns and provide the capacity of each so that caregivers and other users instantly recognize the naming convention.
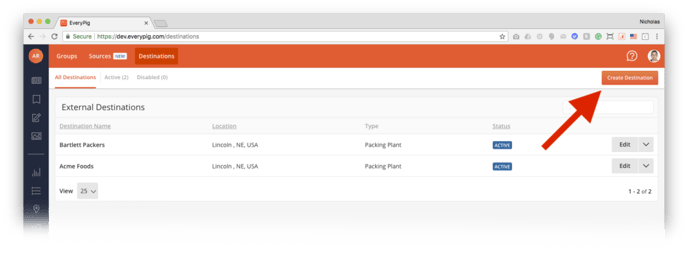
7. Destinations
To take full advantage of EveryPig group tracking, we recommend entering destination information into your account. Destinations can be used to track groups from farm to final destination.
To enter this information go to the group screen and select the Destination tab and click "Create Destination."
If your company doesn't track destinations, you can leave these sections blank.